Phishing is still one of the easiest ways for attackers to worm their way into a company’s systems. No matter how many security tools you throw at the problem, it only takes one person clicking the wrong link for things to go south. That’s why training people to spot and deal with phishing is so important.
Microsoft’s attack simulation training module in the Security Center makes it simple to run realistic phishing tests that don’t just show you who’s at risk but help them get better. This guide breaks down how to set up a phishing campaign step by step, so you can start building a team that’s sharp and ready for whatever’s lurking in their inbox.
- Go to https://security.microsoft.com.
- Navigate to Email & Collaboration > Attack Simulation training > Simulations. Here you can find a list of previously created campaigns. To create a new phishing campaign, click on Launch a simulation.

- The attack simulation training module offers various social engineering techniques to choose from, like Credential Harvest, Malware Attachment, Link in Attachment, Link to Malware, Drive-by URL, and Oauth Consent Grant. Choose the preferred technique for your phishing campaign and select Next.

- Give a friendly name to your campaign, and optionally write a description.

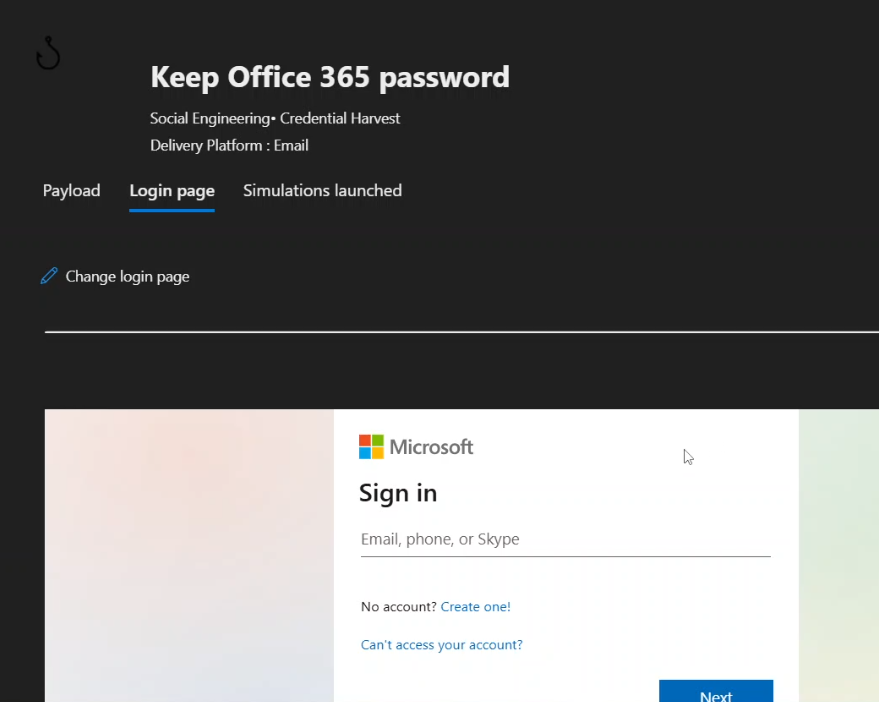
- The next step is to determine the payload that you want to deliver. As with any other phishing campaign software the attack simulator allows you to create custom payloads with personalised email text and attachments. You can do this by clicking on Tenant payloads > Create a payload. Alternatively, you may select one of the ready-made payloads designed by Microsoft from the Global payloads tab.

If you’re familiar with the culture and employee tendencies in your organisation, you’re probably better off creating a custom payload to which they’re more likely to fall victim.
- Each payload designed by Microsoft comes with a nice little metric – Predicted Compromise Rate (%). This serves as an indication of the result to expect when using the predesigned payload & login page. To preview the design of the email and login page, click on the title of the payload (not the checkbox).

- If you’re happy with the payload and login page, move to the next step and select the target users for the campaign. You can restrict the scope to named users or groups, or target the entire organisation. I like to test the campaign on a small group first before a full rollout to the entire organisation.

- Based on your company policy, you may require victims of the campaign to attend a phishing awareness training session. The attack simulator allows you to bake this right into the campaign. You may redirect users to a custom URL to schedule their training session, or opt for the Microsoft training experience. In case of the latter, you may handpick training modules from Microsoft’s catalog to train your users or let Microsoft automatically assign training courses based on the user’s previous campaign results and training experiences.

- With regards to the post-phish landing page experience, some prefer to be more harsh than others. It’s up to you to determine what works best in your organisation. You may choose a pre-designed landing page from Microsoft’s catalog or design one yourself.

- Next, you can configure whether to send user notifications associated with this campaign.
- Positive reinforcement notification (to thank users who report the phish)
- Training reminder notification (if you linked training in the previous steps)


- The last thing to configure is the scheduled date for the attack simulation and the length of the campaign. Once you’re ready, review the details you configured and submit the simulation.

- From my observations, the reporting on the campaign is real-time and the figures are updated every minute (more or less). At a glance, you can get a quick summary of the outcome, with key metrics such as the number of users who:
- were compromised
- reported the message
- read the message
- opened attachments

You also get a tabular view listing all users targeted by the campaign together with some key information such as:
- the actions they took
- whether they reported
- whether they were compromised
- whether they attended the scheduled training

Running phishing simulations isn’t just about catching people out—it’s about giving them the tools to improve. With the attack simulation training in Microsoft Security Center, you can run smart, effective tests that actually make a difference. The goal is to raise awareness, build confidence, and reduce the chances of a mistake turning into a disaster. Keep running these simulations, keep learning from them, and you’ll be well on your way to a team that’s not just prepared but proactive when it comes to phishing threats.